

By popular demand, I have decided to give you all a photo tutorial of the making of a cake, from start to finish (except for the actual baking, but I will give you my recipe!) This is my take on a Hot Air Balloon from Wonderland. The white rabbit is made from home made modelling chocolate and white gum paste and the balloon is decorated in fondant and gum paste. The cake is vanilla sponge of a great constancy for carving while keeping a nice spongy texture (so it is also yummy to eat), filled and crumb coated with vanilla buttercream. The cake is 10" plus and the cake board is 20" in diameter.
I made the whole cake over three days, so I have broken my tutorial down as such.
Day 1:
1. Make the white rabbit.


You need modelling chocolate in red, yellow and purple as well as some white gum paste (or pure white modelling chocolate if you have it). Remember to keep any gum paste or fondant wrapped in plastic when you aren't working with it, this isn't necessary with modelling chocolate.

Start with the yellow. Roll a bit into a smooth ball, then shape into a 'body' shape, add detail. Next, roll out some red, so that it is quite thin, and cut to size for the jacket, using the yellow body to measure (wrap it round the body to see where to cut it), attach it to the body and trim (if the chocolate is warm, it will usually join without the need for edible glue, if not you can use glue, but water won't work). Cut some lapels from the rolled out red chocolate and attach to the front of the jacket, allowing the lapels to stick up a bit.

Now roll out some yellow chocolate, nice and thin. Cut an arched piece using two circle cutters for the shirt collar. Attach, just inside the neck of the jacket, by pressing it into place with a shaper tool on the inside of the collar and trim the ends off. Make a very thin sausage with a bit of the purple chocolate and wrap it round the shirt collar. Shape a little bow by rolling a little ball of chocolate so that it is nice and smooth, press it out into an oblong shape, then pinch the middle in a bit. Use a tool/toothpick to add the detail of the central knot and pleats. Attach to front of collar. The arms will be made later once the rest of the balloon is constructed.
When working with modelling chocolate, you need to try and touch it with your hands as little as possible, use tools where you can. The heat from your hands heats the chocolate up until it gets really soft, then starts to feel a bit greasy. If you keep handling it past this point it begins to crack and stick to your fingers. Instead, just leave it to rest and cool down for a while, maybe work on something else for a bit, then come back to it again later.

To make the head, roll a smoothy ball of white gum paste (measure it against the body to judge to size). Pinch the top of the ball between your fingers, gently, to make the narrow part of the top of the rabbit's head and press it down slightly as well so that the rounder part of the face sticks out more. Do similar, just a little bit, at the bottom to form the chin. Using a ball tool, make oval shaped indents for the eyes. Stick a large shaper tool into the ball, just above the chin, where the mouth will be, with the curved side towards the chin. Pull the tool out and pull down slightly to form the bottom lip. You can do this a few times to improve the shape. Shape the top of the moth as well (don't worry about a lip as this will be covered over). Roll a small oval ball of gum paste, flatten it and score it up the middle (centre image above), this will be the rabbits muzzle. Attach it to the face with edible glue or water and shape it (I ended up making little points on the bottom outside ends and curved then up a bit to look like he is smiling). Use a ball tool to make a hollow for the nose. Take a tiny bit of red and and some white fondant and mix them with and even tinier bit of purple chocolate to get the colour for the nose, roll it into a ball, attach it to the face and press into a slight triangular shape. Add a tiny bit of red chocolate to some white gum paste to make pink for the eyes, roll two tiny balls and press into the eye holes.

Press a little ball of red into the rabbits mouth and score to look like a tongue. Make little teeth from a square of rolled gum paste, scored down the middle and glue to the inside of the top lip. Make a little tuft of hair by flattening a ball of white gum paste and cutting it so that it has 3 'fingers'. Shape the 'fingers' to smooth the out and bring them to points. Attach to the top of the head and style the hair. Roll out white gum paste and red chocolate and cut ear shapes (the red ones a bit smaller than the white ones) stick the red ones onto the white ones the shape the ears by rolling the bottoms inward. Glue onto the sides of the head, then shape the ears to give them a bit of character. Finally, paint on pupils and eyebrows with a tiny paint brush and food colouring, or draw them on with an edible pen (once the gum paste has set a bit). Attach the head to the body.

To make the watch:

Roll a ball of yellow chocolate, then press it flat (about 2-3mm thick). Use a ball tool to make a neat rim around the edge of the circle then press a ball of white gum paste into it to make the watch face. Add two tiny balls of yellow to the top and add a bit of detail. Paint the numbers and watch hands on with food colouring or draw them on with an edible pen (once the gum paste has set a bit).
2. Prepare the cake board

Cover a 20" cake drum with sky blue fondant.
Day 2
1. Bake the cakes

Bake a 10" round, a loaf and a half sphere in a 10" metal bowl.

I baked one whole batch of my recipe to bake in the the bowl and a second batch to split between the 10" round and the loaf tin.
Vanilla Sponge Cake Recipe for carved or stacked cakes PRINT
Makes 9" cake (two pans).
Ingredients:
300g butter or stork Marg
2 2/3 cups (590g) caster sugar
6 eggs, beaten lightly
4 tsp vanilla
600g plain flour, sifted
3 tsp baking powder
1/2 tsp salt
1 ¾ cups (440mL) milk
Method:
Preheat oven to 160°C/ 140°C fan forced.
Grease and line two 9" cake pans.
Beat butter and sugar in electric mixer until light and fluffy.
Add eggs and vanilla and beat until well combined.
Whisk together the flour, BP and salt in a separate mixing bowl.
With mixer on low speed, add flour and milk to butter mixture alternately 1/3 at a time, each time mixing until just combined.
Evenly divide cake mixture into the prepared cake pans. Bake 60 minutes or until a skewer inserted into the centre comes out clean, the cake will also have pulled away from the sides of the tin when done.
Leave cakes to cool and refrigerate for a couple of hours.


I forgot to mention, the top of the basket should have a cut out in it, big enough for the rabbit's waist to fit into once the fondant has been added.

Refrigerate overnight and reserve left over buttercream for tomorrow.
Makes 9" cake (two pans).
Ingredients:
300g butter or stork Marg
2 2/3 cups (590g) caster sugar
6 eggs, beaten lightly
4 tsp vanilla
600g plain flour, sifted
3 tsp baking powder
1/2 tsp salt
1 ¾ cups (440mL) milk
Method:
Grease and line two 9" cake pans.
Beat butter and sugar in electric mixer until light and fluffy.
Add eggs and vanilla and beat until well combined.
Whisk together the flour, BP and salt in a separate mixing bowl.
With mixer on low speed, add flour and milk to butter mixture alternately 1/3 at a time, each time mixing until just combined.
Evenly divide cake mixture into the prepared cake pans. Bake 60 minutes or until a skewer inserted into the centre comes out clean, the cake will also have pulled away from the sides of the tin when done.
Leave cakes to cool and refrigerate for a couple of hours.
Buttercream Icing Recipe
Sandwiches and covers a 9" cake
Ingredients:
200g butter (room temperature)
500g icing sugar
Sandwiches and covers a 9" cake
Ingredients:
200g butter (room temperature)
500g icing sugar
1 TBSP vanilla
milk
Method:
Method:
Beat butter until soft and creamy. Add icing sugar and mix slowly until sugar begins to be incorporated in the butter. Beat until you get a smooth consistency. Beat vanilla in. Add a little milk if needed to loosen the buttercream a bit.
2. Shape and crumb coat cakes
I used a thin 10" cake board and a 5 inch square board to make my balloon shaped board. Just cut one corner off of the square board, then glue it to the round board so that the corners meet the edge of the circle.
Place the 10" round cake onto the cake board, sticking it with a bit of buttercream (I made double the buttercream recipe, but had quite a lot left over at the end.) Spread a good layer of buttercream on top.
Place the half round cake on top of the 10" round. I started filling the edges with better cream, but then decided it needed to be carved.
Carve the edges of the 10" round so that it forms a nice curve with the half round. Cut a thick slice from the loaf cake to form the bottom of the balloon.
And carve a 4" square piece from the loaf to make the basket (on a 4" square cake board with the corners trimmed off).
To fill in the rest of the shape and give it a nice smooth curve, crumb the left over bits of the loaf in a food processor, and add some buttercream to make a 'dough' (the same way you make cake pops).
Use the 'dough' to fill in the gaps on the cake and create the shape of the balloon.
Crumb coat with a thin layer of buttercream.
3. Make the hot air balloon cables
Before you put the cakes in the fridge, position them as they will be for the final cake, the right distance from each other (so make sure that they would fit onto the 20" board with only a tiny bit of space at the top and bottom - there should be plenty of room for the rabbit between the two cakes). Measure, using the picture below as a guide, how long your 6 yellow cables will be (4 long of the same length, 2 short). Now, put the cakes in the fridge over night ;)

4 out of 6 of the cables are attached to the cake board, but two are only supported at the ends, so these two will have a heavy gauge wire attached to them.

Extrude lengths of yellow gum paste (I mixed food colour gel into my white gum paste), using a 1/4" diameter round disc. Cut them to the lengths needed (as measured above). Flatten the ends of the 4 long cables. Lay them so that they are dead straight (I have used a chopping board designed for cutting baguettes - the channels catch the crumbs) and leave to set for a while.

Once they are set enough so that they won't deform if you press on them a bit, brush some edible glue along the top of two of the long cables and press an equal length, paper covered, heavy gauge wire into the cable (you should be able to press it partway into the gum paste). The wires will stick up a bit at the ends because the have been flattened, this is fine.

Leave these to set over night.
Day 3
Decorate the cake:

Buttercream the balloon cake with a thin layer, get the icing as smooth as possible.

Roll out light purple fondant and cover the balloon. I like to use "The Mat" when covering rolling out icing, as it is non-stick without needing icing sugar or cornflour to dust the surface. I tend to only use one side of it though (I find it very difficult to roll the icing out through the top sheet). The top sheet is very handy to cover the rolled out icing if I need to leave it for a time and don't want it to dry out.

Use your hands to smooth out the fondant and get it to hug the form of the balloon.

Trim the edges and buff with your hands to get a good finish.

Now buttercream and cover the basket cake.

The birthday girls's favourite colours are purple and green, so the balloon is purple (which is perfect to suggest the cheshire cat) and the basket and trim are green - you can of course choose any colour you fancy!

Note the hole in the top of the basket - still big enough after covering for the rabbit's waist to fit inside.

Place the balloon and basket cakes CAREFULLY onto the covered cake drum, adhering them with a bit of buttercream (make sure they are placed according to the measurements you made before).

Now fit the white rabbit into the basket and stick in place.
I did all this first thing in the morning, then left the cake for a while so that the fondant had a bit of time to harden, making the next steps easier to do without damaging the finish. You could leave it overnight again.

Make a template for the cheshire cat's smile with a piece of paper.

Cut the mouth out of the light purple fondant covering the balloon cake, exposing the buttercream beneath. Smooth the buttercream out again if any holes are made.

Use the same template to cut a mouth out of white fondant (rolled thinner than the light purple fondant.)

Gently ease the white fondant into the mouth hole and smooth it out, then gently score lines to represent teeth.

Roll out some darker purple fondant, long enough to cover the full length of the balloon cake.

Make templates for the vertical stripes on the balloon and cut the stripes.

Place the paper mouth template over the mouth to protect it, apply edible glue to the back of one of the stripes, then apply it vertically along the centre of the cake. Carefully trim it off where it crosses over the mouth, using the edge of the light purple fondant as your guide. Repeat for two more stripes on either side.

It should look something like this once the three stripes have been applied and trimmed and the paper template has been removed.

Add thinner stripes to the sides, to follow the pattern and give a finished edge to the cake.

Roll and cut thin strips of green and light green fondant, about1/2" wide, and long enough to wrap around 3 sides of the basket cake.

Lay 5 strips, alternating colours vertically over the basket (don't use any glue/water, you want the to stay loose), ensuring they cover the bottom of the basket too. Start weaving horizontal strips, in alternating colours through the vertical strips as illustrated above, glue these ones in place, only on the top surface of the basket as you go. These strips should fall over the full length of the sides of the basket. Once the top is done, start weaving strips around the sides and bottom of the basket. Once the whole basket is covered, trim and neaten all the edges.

Add a half-circle detail to the top of the balloon.

And a frill around the bottom of the balloon.
Next, add the two short yellow cable that you prepared yesterday.

Add the two long yellow cables (without the wires).

At last, we can give the white rabbit some arms! Roll two sausages from the red modelling chocolate, flatten them slightly at the shoulder and use a ball tool to make hollows at the cuffs. Bend them a little for the elbow, and glue them on to the rabbit. Form two little hands/paws from white gum paste, as shown above.

Now apply some gold petal dust to the yellow parts of the rabbit's watch. Extrude some yellow gum paste with a 1/8" disc and place as the chain for the watch. To make it look more like a chain, use a pair of tweezers to pinch the extruded cord slightly at small intervals along its entire length. Then use a pointed tool or toothpick to make a tiny hole in each of the wide bits formed. Finally, brush the chain with gold dust (or painting it on by dissolving the dust in rejuvenating fluid).

The last two cables can now be added, with the wire at the back so that it can't be seen.

Extrude a few more cables using the 1/4" disc, and apply short lengths, extending the long cables up the balloon a bit.

Now use the 1/8" disc in your extruder to make swags to hang between the cables. To quickly and effortlessly make lovely smooth cables with the extruder, soften the gum paste / fondant by kneading it well, and add a generous amount of Trex (not too much though, or you'll just end up with mush!) One squeeze of the trigger should get a few inches of cable when using the 1/8" disc. I didn't use Trex when doing the large cables as I wanted them to set up hard.


Add a tail of swag blowing in the wind.

Add some roses to each junction of the cables and swags. These are meant to represent the queens white roses that were painted red. I completely forgot to take photos of how to make the roses, so I will make some more and add pics later.

Cut little bunting flags out of white gum paste, and a couple of other colours to add interest.

Paint or draw hearts, spades, diamonds and clubs onto the white flags.

Glue the flags onto the top swags, using a little bit of sponge to support the tips so that they 'flap' away from the ballon.


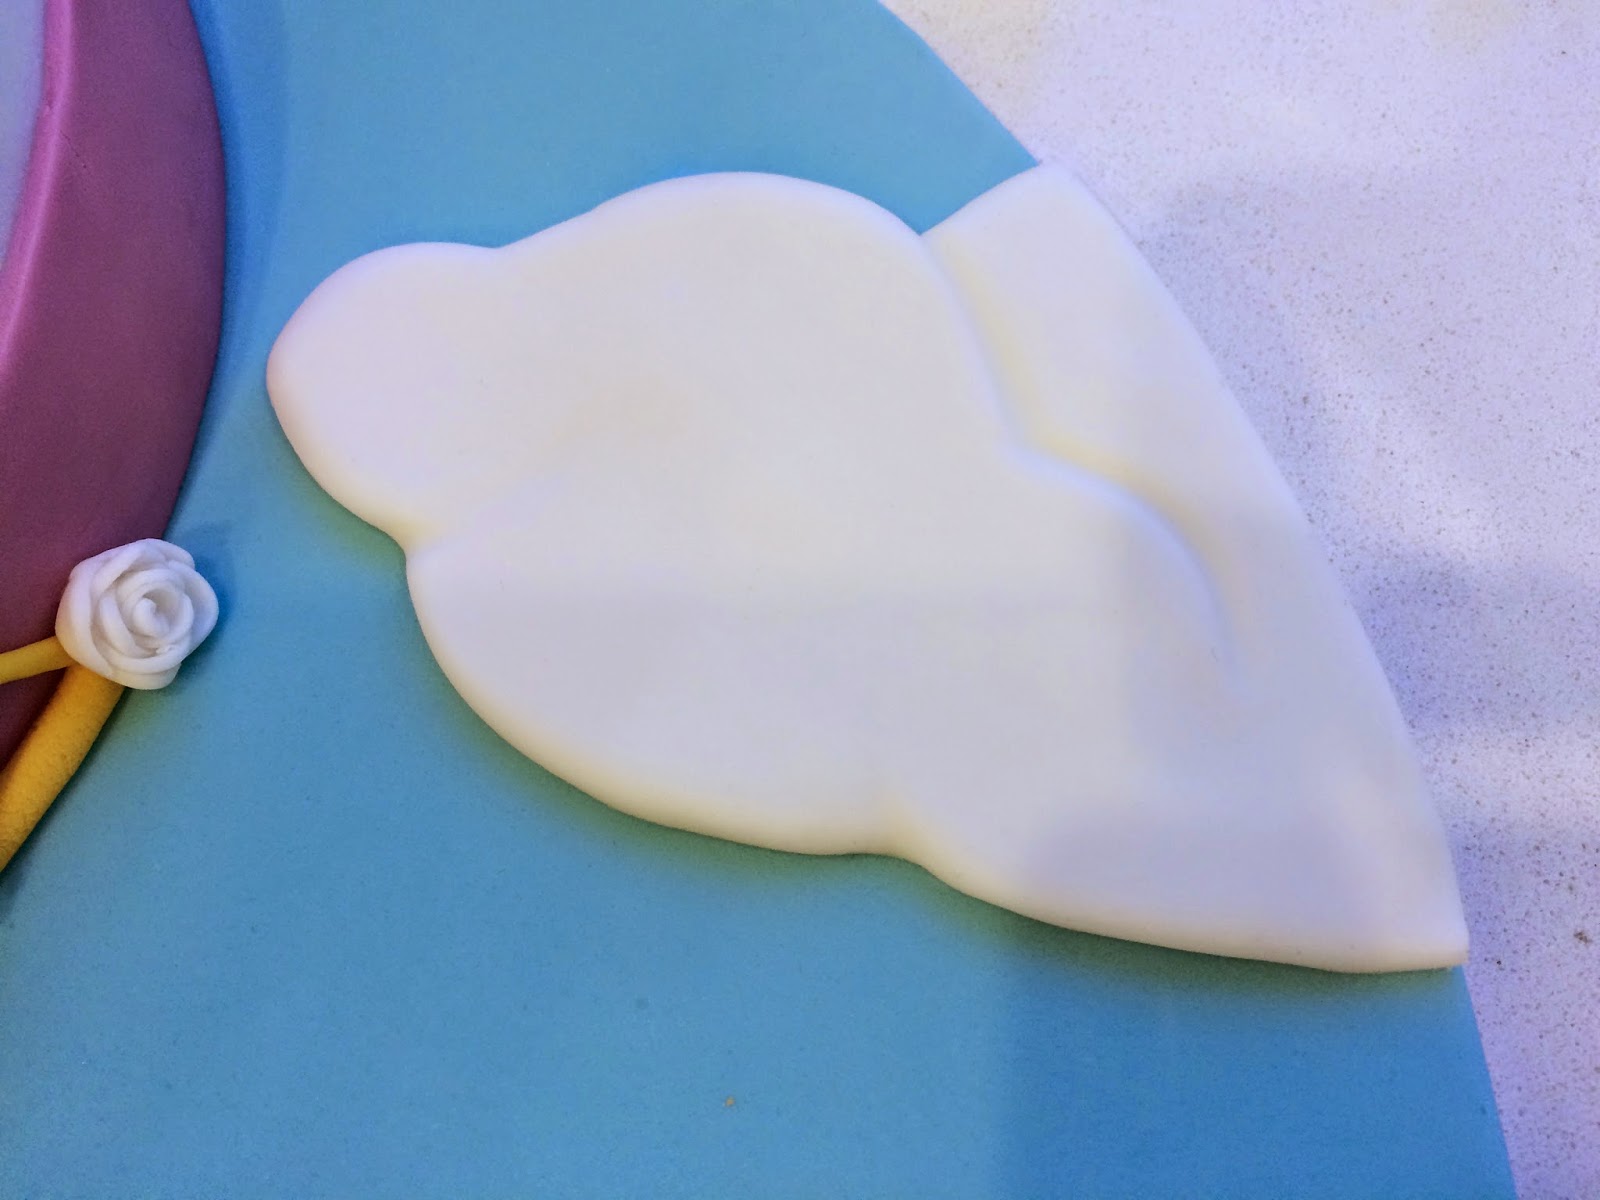
Cut cloud templates from paper.

Roll white fondant out about 1/4"-3/8" thick and cut out the clouds. Run your fingers around the sides to curve the edges and give them a soft look.

Add some subtle detail to the clouds to make them look puffy.

After an hour or two you should be able to remove the bits of sponge.

And the cake is complete!!

I hope you enjoyed this tutorial and that it will be helpful to you. Please leave me some feedback, and I would be happy to answer and further questions you may have.

Happy Baking!

What Great Tutorial to make an Alice in wonderland cake. Tanks for Posting!
ReplyDeleteThank you Maria :) I hope it is of some help to you!
DeleteBeautiful tutorial thanks for sharing!!!!
ReplyDeleteThank you so much Becky xx
Deletesuper awesome job
ReplyDeleteWOW, this is fantastic! Thank you so much for taking the time to share your talents with us. I can't wait to give it a try!
ReplyDeleteCan you share a list of tools you used for this project and pictures of how you made the roses? its a beautifulllllllll cake!!
ReplyDeleteThat is the best step by step tutorial Ihave seen sofar. Thank you so much, I used the rabbit for my best friends birthday cake, it turned out awesome! Thanks again!
ReplyDeleteHi Elaine, Wonderful cake. The step by step instructions are neatly laid out in detail. I loved the idea of how you laid the balloon shape flat on the cake board leaving a little space for the basket. I was thinking of a balloon suspended above the basket but your idea is simple and neat. Great work!
ReplyDeleteThank you all for your kind comments xx
ReplyDeleteHi, how do you make perfect cut stripes on the balloon? do you have the template?
ReplyDeleteI made myself a template with paper, just judging what they should look at by eye, and then laying the paper onto the cake to see if they looked right, and adjusting my template until I was happy.
DeleteI love this tutorial :D I make the rabbit with polymer clay for a friend ^^
ReplyDeleteThanks a bunch for sharing this with all of us you actually recognize what you're speaking about!
ReplyDeleteBookmarked. Please also visit my web site =). We could have a link
trade arrangement among us
Oh my goodness...thank you for sharing!!
ReplyDeleteI wanted to thank you once more for your amazing web page
ReplyDeleteyou have designed here. It's full of ideas for those who are definitely interested in this kind of subject, specifically this very post.
You're really all so sweet as well as thoughtful of others
and also reading your site posts is a wonderful delight to me.
And what generous treat! Dan and I will certainly have enjoyment making use of your ideas in what we have to do in a few weeks.
Our listing is a distance long which means your tips is going to be put to fine use.
Keep on working, great job!
ReplyDeleteBut a smiling visitor here to share the love (:, btw outstanding design.
ReplyDelete