Monday 23 April 2012

Toffee Apple Pie


I love apple pie, as does my husband, but our kids just don't get on with it. So, after seeing chef Raymond Blanc make it on TV, I thought I would try something a bit different and finally found an apple pie that we all love. What we fondly call "Toffee Apple Pie", with its delicious caramelised apples and crisp puff pastry, is better known as Tarte Tatin. An upside down pie first created, by accident, by the Tatin sisters in their hotel in France in the 1880s.


The most difficult part of this recipe to master is the caramel. You want to get it to a beautiful golden brown colour to get that bitter caramel flavour that contrasts so well with the tart apples.


Too pale and you don't get the fullness of flavour, but leave it too long and you will suddenly find your caramel too dark and then it just tastes burned! Don't be afraid to throw it away and start over.


The best thing is to experiment with your pan. I have found that if I remove my caramel from the heat when it is about half way to the colour I want, the residual heat in the pan will take it the rest of the way without burning it.


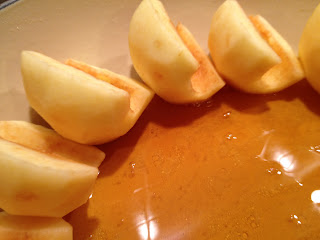
I add my apples in halves, simply because I prefer the way the pie looks when it is done.


I also find that my puff pastry rises better if I cut it exactly the size of the pan (I use the lid to make an impression in the pastry, then cut around it) and don't 'tuck in the edges,' but that is probably just a matter of preference.


Mmmm, just look at the rich colour of those apples, the gloss of the caramel and the crumbly, crispy layers of golden pastry...


...all it needs now is a dollop of ice cream.


PERFECT!


Thursday 19 April 2012

Soft Cinnamon Buns with Cream Cheese Icing


How do you like to eat them? Use a fork, or get those fingers sticky? Gradually unroll, or just bite into it? Cinnamon buns are a firm favourite in my family, and we all have our own way to eat them. My daughter likes to unroll hers and cut little bits off, while my son likes to take big bites out of his, in his words, "the same way I eat  hamburger."


These buns come out deliciously soft and squidgy, dripping with gooey cinnamon syrup and drenched in rich cream cheese frosting. You never have to worry about left overs If you have any leftovers, they still taste great the next day, just store them in an airtight container and warm up individually in the microwave for 30 seconds.I like to make the dough in my bread machine - while it doesn't reduce the preparation time (at least 3 hours), it does require less of my time and attention and I can get on with other things, and they come out perfectly every time. If you prefer to though, there is no reason why you can't make it by hand. Note: it is a very soft and sticky dough.

Makes 15 buns

Ingredients:

Dough:
1 package instant yeast
4 cups all-purpose flour
1/2 cup sugar
1/2 teaspoon salt
1 cup slightly warm milk
80g softened margarine
2 large eggs

Filling:
1/2 cup demarera sugar
2 tablespoons ground cinnamon
80g melted margarine

Cream cheese icing:
150g smooth cream cheese
150g margarine
2 cups icing sugar
1 tablespoon vanilla

Method:
Place all the dough ingredients in the bread machine in the order recommended by it's manufacturer. I add dry ingredients first in my current machine, but my previous machine required liquids to be added first. The dough should rise until it has has doubled in size after the kneading is done, I usually have to leave it a further 30 minutes after the machine has finished.


While the dough is rising, get everything ready for the next stage:

  • Make sure you have enough surface area to roll out a 23x15" rectangle of dough.
  • Measure out the cinnamon and sugar for the filling and melt the margarine.
  • Line 3 8" square high sided tins.
  • Get out a tape measure, some dental floss, a rolling pin, a basting brush and flour for dusting your surface.
  • Preheat your oven to 195°C.


Stretch the dough out on a lightly floured surface into a rectangular shape, and then roll it out into a 15" by 23" rectangle, with the 23” side running left to right. Try to keep the sides as straight as possible, measure across the narrowest point.


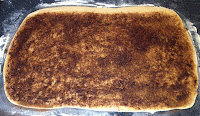
Brush the melted margarine over the dough, leaving a 1" clean space along the edge furthest from you (this is used to seal the roll), then sprinkle over the sugar and cinnamon and rub in slightly. This filling forms the syrup, so you want to make sure all of the sugar and cinnamon is moistened by the margarine.


Brush the clean edge with a little water, then roll the dough up towards that edge. Measure your roll to make sure you still have 23" (excluding the uneven bits sticking out the ends), if it has shrunk a bit, gently roll it to stretch it out.


Trim one end of the roll so that it is ‘square', then mark the roll every 1 1/2 inches from the square end.


Now cut the roll on the marks by slipping a piece of dental floss under the roll, bringing it round crisscrossing it and slicing the dough off neatly. This is the best way to keep each bun neat and even, but you can cut them with a very sharp knife too. You should get 15 buns.


Place 5 buns into each tin, evenly spaced from each other and the sides of the tin. (One bun in each corner, and one in the center.) Cover and rise for 1 hour, when ready, the buns should be touching each other and the sides of the tin.


Bake at 195°C for 10 minutes, one tin at a time, they should be only lightly browned when done. Remove them from the pan as soon as you can touch them and separate the buns from each other.


Icing:
Prepare while the buns are doing their final rising, before baking.


Beat the cream cheese and margarine on low until combined, then beat on high for 5 minutes to get it light and fluffy. It tends to look a little 'separated' at this stage, but don't worry, it will come together again. Add the icing sugar in parts, beating after each addition on low until it is combined. Add the vanilla and beat for another minute.


Split the icing into 3 portions, ready for when the buns come out of the oven (otherwise I tend to be a bit heavy handed on the first batch and don't have enough for the last).Spread the icing over the buns while they are still hot so that it can melt down into the buns, making them delicious! Best eaten while still warm.

Enjoy!


Wednesday 18 April 2012

Pamper Party

This year, for her 7th birthday, my daughter decided she wanted to have a girly pamper party. Once we decided on a pink, purple, red and white colour scheme, the fun began. The cake, of course, was the most important element to start with. I went with 2 layers, one vanilla and one dark chocolate, with vanilla buttercream icing and fondant. Lots and lots of fondant!


I think my favourite element has to be the hand mirror.


Then I got this mad idea to put jelly (jello) into the centre of the vanilla cake. I remember seeing someone do something similar on a blog somewhere, and thought it looked like jewels, so I thought I would give it a shot. It worked well and added a real WOW factor when the cake was cut.


But of course, I couldn't JUST do cake, could I? So I made iced cookies and cake pops too (they are, after all, an excellent use for all the cut offs from the cake). These were complimented with glass jars and dishes filled with candy, piles of fruit and veggies, cocktail sausages, cheese and biscuits, marshmallow lollipops, popcorn and candy floss.


Next came the decorations. I made lots of big tissue paper pom pom flowers (with plenty of help from my son), bunting, labels and popcorn boxes and then lavished the area with ribbons, feather boas, throw cushions, rose petals and other little details. Each girl would get a personalised pink satin party bag, stuffed with goodies, to take home.


So, what did they do at the party? They made their own lip gloss, enjoyed a facial, had their hair styled, got their nails painted, made friendship bracelets, bejeweld a personalised make-up mirror and made up their faces. Oh, and ate plenty of candy!


Thanks to some wonderful friends who gave up their afternoon to help me run it all, the girls had a fantastic time.


Tuesday 17 April 2012

Hyde Park


Last week we spent a few days in London, on one of those days we took Uma into the city with us and spent the entire day in Hyde Park. This was probably the highlight of our week, the weather was perfect and we explored the park from end to end, and then back again. The kids ran all over the place with Uma, investigating, chasing pigeons, climbing statues, jumping in puddles left from the overnight rain, watching squirrels, rolling on the lawn and even getting another little girl involved in an energetic game of 'it', Uma's favourite game. We licked ice creams, had a picnic lunch and munched Krispy Kreme doughnuts. When we reached the recreation part of the Serpentine, Uma got a little over excited at the sight of all the ducks and chased them right in to the water, slipping down the algae covered slope straight in to deep water - I had to haul her out by her whiskers! Needles to say, she didn't go in to the water again and the ducks were safe, if fact, they almost seemed to be taunting her, keeping pace beside us as we walked, but staying just out of reach :) The swans however were another story, they took offence to Uma's barks and, to Tasha's horror, swam right up, puffing them selves up and hissing angrily, neither dog nor swan would back down, so we had to quickly move on. It was really very funny.


Starting my blog

So, I've been wanting to do this for a while now, and even tentatively did start a blog couple of times. It has taken way too long a bit longer than I would have liked, but I have finally done it! Introducing Elaine's Sweet Life, a blog about my life and all the things I love. While it will primarily be about baking, I have too many other passions that I would like to share, not least of which being my family.