Sunday, 8 March 2015

Making Madeleines


My husband bought me some Madeleine pans last week, so this weekend I tried making these yummy little cakes - or are they cookies?


I made 2 batches with the same recipe - I used a "chill the batter in the fridge for hours" recipe.
Batch 1 tasted OK, but the texture was a little bit coarse. As you can see from above, batch 2 has a softer, more spongy texture. Th flavour was also better in the 2nd batch.

Batch 1: Hand mixer and Stork margarine.
I beat the eggs and sugar with a hand mixer for 8 minutes. The mixture was thick and light, but had quite big bubbles. By the time I had added all the flour, it was quite a loose batter. The melted margarine was quite hard to incorporate, and made the batter even more runny. Even after leaving in the fridge for 4 hours, the batter was soft, and spread as soon as I  spooned it into the mould.


They baked OK, though they spread even more, spilling over the edges of the moulds and the tops came out nearly flat (I trimmed the irregular edges off - I thought I had taken a photo before I did that but I can't find it now).


The kids and I thought batch 1 were quite nice, though my husband didn't like them at all, he said they just weren't right.

Batch 2: Stand mixer and Butter.
This time I beat the eggs and sugar in my KitchenAid Artisan mixer. After 8 minutes the mixture was light and fluffy with a much more silky texture than in batch 1. After the addition of the flour the batter was really thick. The butter was easier to incorporate and the batter was still quite thick. After leaving in the fridge, the batter was thick enough to hold it's shape, though still soft and fluffy. My son said it looked a lot like mashed potatoes.


This time they baked beautifully, with that classic dome in the middle.


Unfortunately, my oven does not bake evenly, so I end up with a range of golden browns across the batch.


A little bit of lemon glaze and they are ready to eat. These ones tasted great, even my husband agreed.


I want to try another recipe, one that includes lemon zest in the batter and doesn't require a glaze. I'll let you know how that works out...


Friday, 6 March 2015

Graffiti & Gum Balls


I had a last minute cake to make for one of my son's friends today. The whole thing, from baking to decorating and delivering had to be done within 9 hours, so the cake needed to be kept quite simple. There was no particular theme, but I know the young man likes chewing gum, so I got the idea to fill the top of the cake with gum balls, but then wasn't sure what to do with the rest of the cake.


I had a chat with my friend, hoping that bouncing ideas off of her would either help me find inspiration, or that she would come up with something brilliant. Well, I think we ended up with a combination of both, I'm not sure who actually said the word first, but we finally settled on the idea of  putting GRAFFITI around the sides of the cake.


I got an airbrush for Christmas (well, an early Christmas present... that I bought for myself), so I thought this would be the perfect opportunity to play with it a bit. I've only used it for simple stencilling and solid colouring so far!


I have to admit, I felt really nervous sitting in front of this blank white 'canvas'. I sat staring at it for quite a while before I finally took a deep breath, pulled back on the trigger and started laying down colour. I'm not 100% happy with the result, but I don't think it's too bad for a first try?


I made my favourite dark chocolate sponge for this cake - i'ts my reliable go to cake. I can mix it up in minutes and it comes out moist and delicious every time. It is my most requested cake flavour by far.


I filled the cake with soft, fluffy chocolate icing, damming the edges with chocolate ganache.


I didn't make quite enough ganache to properly finish the cake, and didn't have time to wait for the new batch to cool to the right spreading consistency, so I dumped it all out on my cool granite work surface and just spread it out to cool quickly. It worked like a charm! Instead of waiting 3-4 hours, my ganache was ready in about 10 minutes!


Happy Birthday Walter!!


Wednesday, 4 March 2015

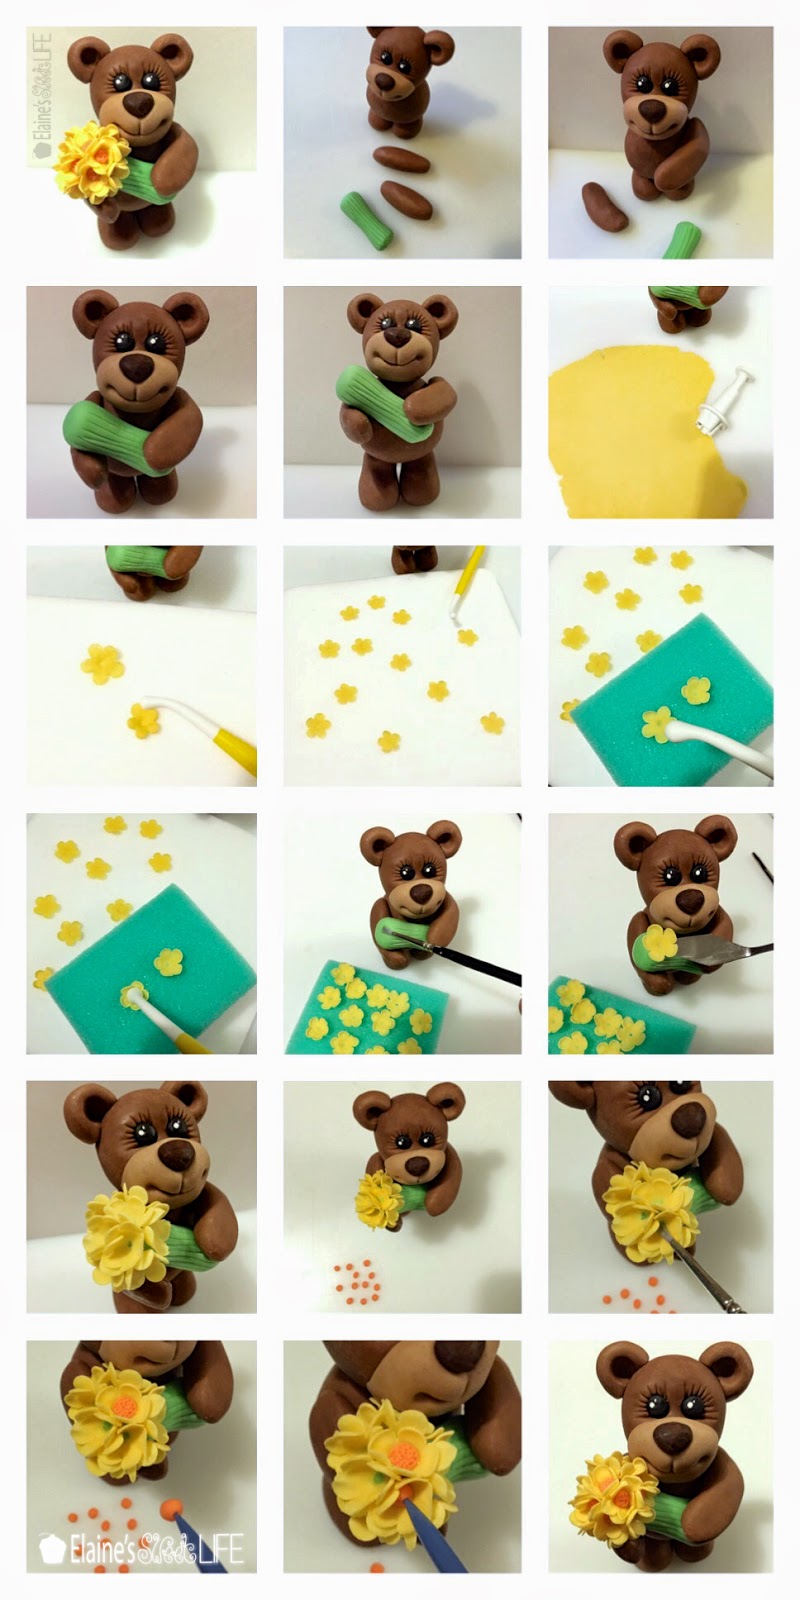
Teddy Topper {Tutorial}


With Mother's Day fast approaching, I thought I'd make a tutorial for a Mother's Day appropriate cake topper. Meet Theo, a charming little Teddy with a big bunch of flowers for his amazing Mum.


This little guy is made of modelling chocolate - his body is made with milk chocolate, and I mixed in a bit of white modelling chocolate for his muzzle. His nose is dark chocolate. The eyes and flowers are made of gum paste.

If you would prefer a Thea, the addition of a pretty little gum paste bow makes it a little Teddy girl.


I have tried to include as much detail as possible in this photo tutorial, please just ask if anything is unclear. It is in 3 parts (3 separate images) - just click on the image to get a a larger view.

One thing to note: Modelling chocolate sets really hard quite quickly, so it is not necessary to have any internal support structure inside. Just after working with it it is very soft though, so let the legs, body and head set for a while, until it feels solid, before assembling, or you may find that they deform. If you find that the legs and head don't stick well to the body, you can use uncooked spaghetti to strengthen the join. I do find the edible glue strong enough, but I usually leave the figurine overnight to set, before handing.

✤✤✤
✤✤✤
✤✤✤

Have fun!

Sunday, 1 March 2015

The Very Hungry Caterpillar Party {Tutorial}


I got to make another Very Hungry Caterpillar cake! This one was for my BFF's little girl who has just turned one.


This cake  is completely free of any fondant. Four layers of moist chocolate cake (recipe) are sandwiched together with creamy chocolate icing, then covered in vanilla buttercream.


The fruit and caterpillars on the cake are vanilla sugar cookies decorated with royal icing, then hand painted to add details.


 The cake has 1 apple, 2 pears, 3 plumbs, 4 strawberries and 5 oranges on it. As well as both a tiny little caterpillar and a big fat one.
The Eric Carle style spots are made by stencilling coloured buttercream on to the cake.


Start with a smooth buttercream finish on the cake which has been well chilled in the fridge.


You will need a stencil (I made mine myself by cutting a few holes in a plastic sheet), a small spatula and various colours of buttercream.


Load the back of your spatula with a little bit of buttercream - scoop up a bit of one colour, then a bit of a second. Holding the stencil firmly against the cake, spread the buttercream over one of the holes, making sure you fill the hole right up to the edges and get a reasonably smooth finish. Clean off the spatula, load it with another two colours of buttercream, and spread it over the next hole in the stencil.


Repeat until all the holes are filled with different colours and carefully lift the stencil away from the cake.


Shift the stencil along and repeat until the whole cake is covered.


You can get different effects by loading the buttercream onto the spatula in different ways and by changing the angle of the spatula as you spread the buttercream onto the cake.


I made a few spots on my counter top to better demonstrate the technique (it was easier to take photos).


I did not make this cake on my own, my BFF did a lot of the work. The Birthday Girl lent a hand too!


Can you believe this is her first time decorating cookies?


Once the royal icing was fully set on the cookies, I hand painted the details on with food colour gel.


The cookies were then attached to the cake with royal icing.


The whole party was set around The Very Hungry Caterpillar theme. This is the invitation we made.


And the Birthday Girl's outfit. The design on the top is drawn on with fabric markers. The tutu is made from strips of organza.


The decorations were all red and green, and mostly spotty. The food was all based on foods that the Hungry Caterpillar ate in the book. Except for the mini sandwiches - they make up a caterpillar, with a tomato for his head. Paper plate caterpillars crawled all around the room, and the party bags were finished with pictures of the butterfly he becomes. Guests were also given fruit badges to wear, which split them all into teams for various party games (you can see some of them on the green plate on the right).


This is me with the Birthday Girl - she is telling us that she is ONE!


She got the entire top tier of the cake to 'smash'. She had a great time pulling it apart and eating it!


Happy Birthday sweet girl!!

Thank you to my BFF for letting me help with all your party preparations, I had a wonderful time, and I think we make a great team!