Showing posts with label Tutorial - sugar craft. Show all posts

Saturday, 30 May 2015

Making realistic woodgrain with fondant {Tutorial}


I have seen a few tutorials on making woodgrain with fondant or sugar paste, that use a similar technique, but I have refined it to a point where I am really happy with the quality of the result - a convincingly realistic wood look.

To start you need 3 shades of brown fondant. About half of your total quantity will be the lightest colour. Of the half thats left, one third is the darkest colour. There should be a very big difference in shade between the lightest and darkest colour for the best result. For a paler wood, tone the middle colour closer to the lightest colour. For a darker wood, the middle colour should be closer to the darkest colour. You also need a pot of dark brown food colour gel.

I used 1kg of ivory fondant and 500g of dark brown fondant. I split the dark brown in half, one half I left as is, the other half I mixed with about a quarter of the ivory fondant to get my middle colour. I darkened the remaining ivory fondant a little bit by kneading in some dark brown and yellow food colour gel.


Roll out all three shades of fondant into sausages of equal length.


Stack the sausages on top of each other, lightest at the bottom, darkest at the top.


Now paint a narrow line of dark brown food colour gel down the centre of the darkest colour fondant. Be quite generous, but don't leave any clumps of gel.


Grab the right end of the stacked sausages and fold it over by one third,


then fold the left side over that.


Press it together and roll into a long sausage.


Again, fold the right side over by a third,


then fold the left side over that,


and roll into a long sausage.


Repeat this process over and over again. I find I usually do it about 5-7 times, depending on how fine I want the woodgrain to be.


Don't twist the sausage at any point. You can fold the ends over in different directions, but keep the grain reasonably straight through the process for the best result.


This is what I ended up with after folding and rolling 7 times:


Cut the sausage into manageable sized pieces. The size depends on how big you want your wood panels to be. If you want very narrow panels, then work with smaller pieces and roll the sausage out thinner. I chose to make broad panels this time, so I left the sausage quite thick and split it in to 3 pieces. Wrap all all of the pieces you are not working with in plastic to stop them drying out.


Roll out one of the pieces, always rolling along the grain.  Use spacers to make sure every piece you roll out is the same thickness.


Trim off the untidy edges.


You want to roll the pieces out to just a little wider than you would like your panels to be. If you want narrower panels, make the sausage longer and thinner before rolling it flat. Bear in mind, any bits trimmed off can't be reused for wood grain, so you want to make sure you are trimming off as little as possible.

Measure out a piece long enough to go across the board (or to fit wherever you will be putting it).


and stick it down with edible glue.


Trim the edges to fit.


Cover ay left over pieces with plastic until you are ready to use them - they dry out really quickly!


Now repeat the process with the remaining pieces of sausage.


Exposed folds in the sausage form beautiful wood rings and knots.


Think about how you lay your wood panels out. What pattern do you want to follow?


I wanted my panels to have a small chamfered edge between them, so I ran a colour shaper down the joins.


Then I used a colour shaper with a sharper point to trace along the lines of the grain to give the wood a bit of texture and rough up the smooth surface a bit.


And that is it, so simple, but so effective!


Wednesday, 4 March 2015

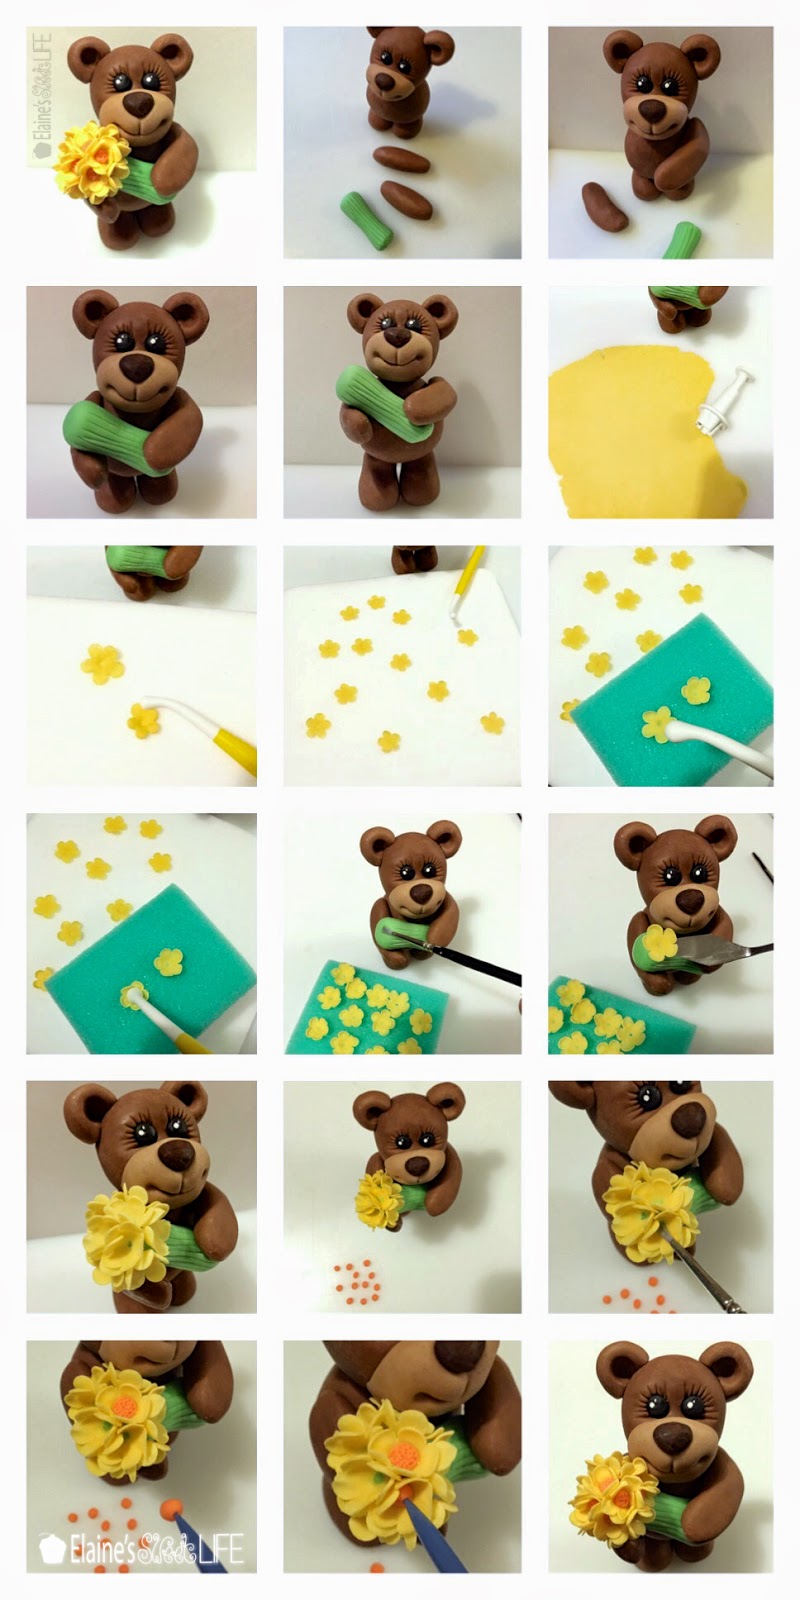
Teddy Topper {Tutorial}


With Mother's Day fast approaching, I thought I'd make a tutorial for a Mother's Day appropriate cake topper. Meet Theo, a charming little Teddy with a big bunch of flowers for his amazing Mum.


This little guy is made of modelling chocolate - his body is made with milk chocolate, and I mixed in a bit of white modelling chocolate for his muzzle. His nose is dark chocolate. The eyes and flowers are made of gum paste.

If you would prefer a Thea, the addition of a pretty little gum paste bow makes it a little Teddy girl.


I have tried to include as much detail as possible in this photo tutorial, please just ask if anything is unclear. It is in 3 parts (3 separate images) - just click on the image to get a a larger view.

One thing to note: Modelling chocolate sets really hard quite quickly, so it is not necessary to have any internal support structure inside. Just after working with it it is very soft though, so let the legs, body and head set for a while, until it feels solid, before assembling, or you may find that they deform. If you find that the legs and head don't stick well to the body, you can use uncooked spaghetti to strengthen the join. I do find the edible glue strong enough, but I usually leave the figurine overnight to set, before handing.

✤✤✤
✤✤✤
✤✤✤

Have fun!

Sunday, 1 March 2015

The Very Hungry Caterpillar Party {Tutorial}


I got to make another Very Hungry Caterpillar cake! This one was for my BFF's little girl who has just turned one.


This cake  is completely free of any fondant. Four layers of moist chocolate cake (recipe) are sandwiched together with creamy chocolate icing, then covered in vanilla buttercream.


The fruit and caterpillars on the cake are vanilla sugar cookies decorated with royal icing, then hand painted to add details.


 The cake has 1 apple, 2 pears, 3 plumbs, 4 strawberries and 5 oranges on it. As well as both a tiny little caterpillar and a big fat one.
The Eric Carle style spots are made by stencilling coloured buttercream on to the cake.


Start with a smooth buttercream finish on the cake which has been well chilled in the fridge.


You will need a stencil (I made mine myself by cutting a few holes in a plastic sheet), a small spatula and various colours of buttercream.


Load the back of your spatula with a little bit of buttercream - scoop up a bit of one colour, then a bit of a second. Holding the stencil firmly against the cake, spread the buttercream over one of the holes, making sure you fill the hole right up to the edges and get a reasonably smooth finish. Clean off the spatula, load it with another two colours of buttercream, and spread it over the next hole in the stencil.


Repeat until all the holes are filled with different colours and carefully lift the stencil away from the cake.


Shift the stencil along and repeat until the whole cake is covered.


You can get different effects by loading the buttercream onto the spatula in different ways and by changing the angle of the spatula as you spread the buttercream onto the cake.


I made a few spots on my counter top to better demonstrate the technique (it was easier to take photos).


I did not make this cake on my own, my BFF did a lot of the work. The Birthday Girl lent a hand too!


Can you believe this is her first time decorating cookies?


Once the royal icing was fully set on the cookies, I hand painted the details on with food colour gel.


The cookies were then attached to the cake with royal icing.


The whole party was set around The Very Hungry Caterpillar theme. This is the invitation we made.


And the Birthday Girl's outfit. The design on the top is drawn on with fabric markers. The tutu is made from strips of organza.


The decorations were all red and green, and mostly spotty. The food was all based on foods that the Hungry Caterpillar ate in the book. Except for the mini sandwiches - they make up a caterpillar, with a tomato for his head. Paper plate caterpillars crawled all around the room, and the party bags were finished with pictures of the butterfly he becomes. Guests were also given fruit badges to wear, which split them all into teams for various party games (you can see some of them on the green plate on the right).


This is me with the Birthday Girl - she is telling us that she is ONE!


She got the entire top tier of the cake to 'smash'. She had a great time pulling it apart and eating it!


Happy Birthday sweet girl!!

Thank you to my BFF for letting me help with all your party preparations, I had a wonderful time, and I think we make a great team!